Configuring the Note Dispenser Cassettes
Setting Note Denomination
The Cash Dispenser supports up to three different note denominations. The denomination magnet configuration communicates the denomination of the notes contained within that cassette. The Kiosk software uses this information to determine which cassette it needs to use to dispense change to the customer.
There are four magnet slots in each cassette. One magnet is inserted in each of two slots to define the denomination contained in that cassette.
Note: The denomination of the notes loaded into the cassette MUST correspond with the magnet settings.
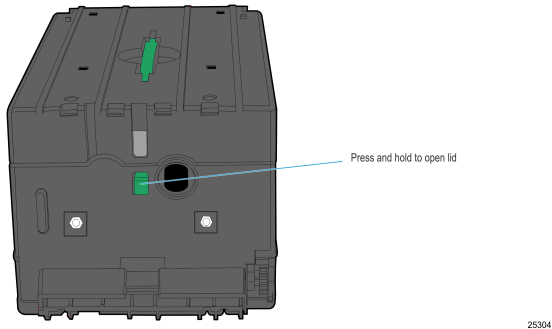
1.Press the release button (green) at the back to open the cassette.
2.Remove the two screws securing the Bracket Clip Plate to the cassette Lid. Make sure to retain the two nuts on the outside of the lid.

3.Insert a denomination magnet into each of the two slots that define the currency denomination for that cassette. Insert the white end of the magnet into the magnet slot with the white side facing the outside of the cassette lid, opposite the Bracket Clip Plate.
Note: The magnet setting details for each supported country’s currency denomination are provided in Appendix B, "Notes Dispensed."
|
Denomination |
Magnet Position |
|||
|---|---|---|---|---|
|
D |
C |
B |
A |
|
|
Type A |
|
|
X |
X |
|
Type B |
|
X |
|
X |
|
Type C |
X |
|
|
X |
|
Type D |
|
X |
X |
|
|
Type E |
X |
|
X |
|
|
Type F |
X |
X |
|
|
The illustration below shows the magnet setting for denomination type C.

4.Verify that the denomination magnets are completely fitted into the slots.
5.Place the bracket clip plate over the magnets and secure to cassette with two screws.
6.Secure the screws with red Loctite.
Setting Note Length and Width
Two models of note cassettes exist. Inspect the part number found on the bottom of the cassette to determine which Length setting to use. The label indicates KD03243-C500 or KD03243-C520.
Note: For more information on the length and width settings for each released country and note denomination, refer to the "Notes Dispensed" section.
1.Lift both the Pressure Plate and Back Plate to the up position.
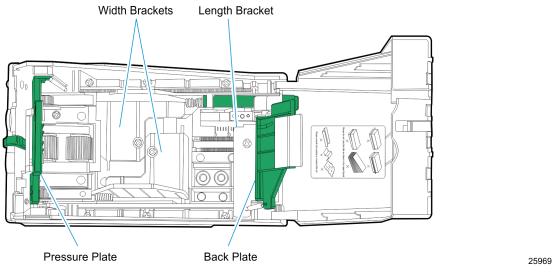
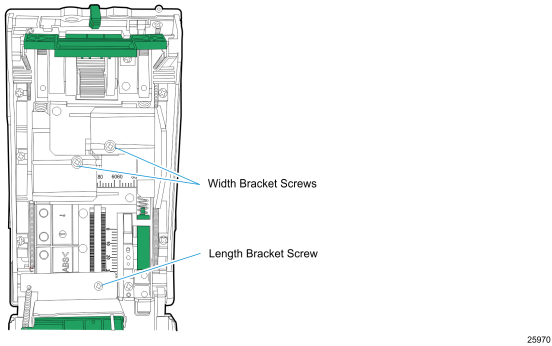
2.Loosen the screw on the Length Bracket and slide it to the back of the cassette.
3.Loosen the two screws securing the Width Brackets and slide them out to their fully extended positions.
4.Determine the width setting of the note denomination that is loaded in the cassette. Refer to the "Notes Dispensed" section for information on length and width currency settings for the appropriate country.
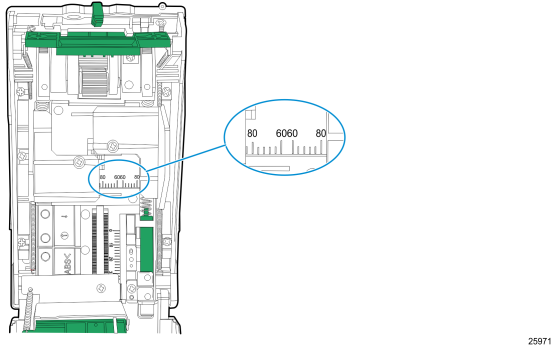
5.Adjust the width brackets by sliding them to the appropriate width setting value. Each mark on the width ruler is 4 mm.
Example: If the note setting is 68 mm, slide each width bracket to the second mark past the center mark of 60. In the following illustration, the width brackets are shown set to 84 mm.
6.Secure the width brackets in place by tightening the screws.
7.Determine the length setting of Note denomination that is loaded in the cassette.
8.Adjust the length bracket by sliding it so that the back side of the bracket is at the length setting value provided in Appendix B, "Notes Dispensed."
Each mark on the length ruler is 2 mm.
Example: For example, if the note setting is 34 mm, slide each length bracket to the second mark past the 40 mark. The following illustration shows the bracket set at zero (0).
Cassette KD03243-C500
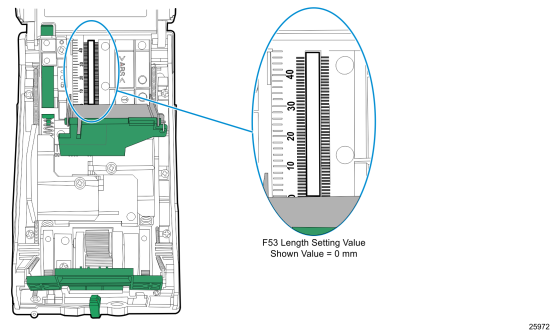
Note: When adjusting the note length on a KD03243-C500 cassette, position the Length Bracket so that the vertical side is at the desired value as shown in the previous illustration.
Cassette KD03243-C520
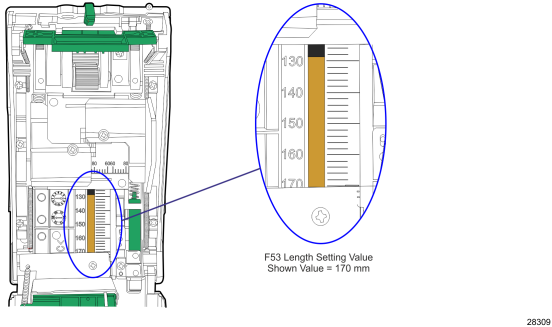
Note: When adjusting the note length on a KD03243-C500 cassette, position the Length Bracket so that the vertical side is at the desired value as shown in the previous illustration.
9.Insert the notes and verify that if the notes fit in the cassette.
10.Remove the note and lock the length bracket in place by tightening the screw.
11.Close the cassette Lid, the cassette is now configured for the desired note.